Super Easy Bread Machine Sourdough - that works!
This recipe uses a bread machine to do the kneading, but everything else is done outside the machine and is very quick, reliable and straighforward. There's none of that ridiculous - "wedded to your bread" endless stretching and folding that "sourdough bread gurus" would have you doing - and you can actually still have a life - and make delicious nutritious bread!
Equipment
- Deep bread tin
- bread machine
- warming cabinet (not essential)
- pyrex bowl,
- Digital scales
Ingredients
To Create the initial starter - you only do this once!
- Ingredients for creating the starter
- 250 g of wholemeal flour – starter creation
- 250 ml of filtered water – for starter creation
Ingredients to make one loaf of bread
- 725 g of strong wholemeal bread flour – Dove’s farm or similarly high quality
- 40 g of vegan margarine/olive oil
- 10 g of sea salt
- 530 g of filtered or bottled spring water
- 70 g mixed seeds - ground Optional - but it makes it super nutritious - if using then add 55g extra water (or plant milk) with the ground seeds.
Instructions
Creating the initial starter
- Add 50g of water to 50g of flour and mix – cover & leave in a warm place (24-26°C is ideal) for 24 hours – a folding proofing cabinet is ideal for this – Brod & Taylor make a good one:- see note at end for link to site…..
- For 4 more days consecutively add a further 50g of water and 50g of flour mix well each time - cover and leave.
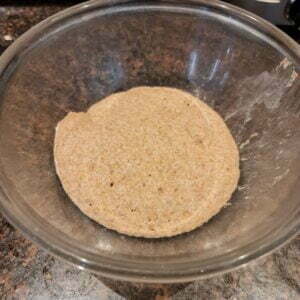
- After the 5th day, you should have 500g of starter batter, which should be fairly active with a slightly sour smell and bubbles showing on the surface with frothy appearance when stirred or looked at from the side in a glass bowl.
- When you want to make a loaf (for the first time only), put 100g of this mix in the freezer as your back-up policy – or you can give it away to someone else as a starter primer – or use to make pancakes.
Making the first loaf.
- The following steps are what you will do every time you want to make a loaf.
- Transfer the your 400g of starter to a larger bowl, and preferably allow to warm up to room temp or 27°C if you are using the quicker method - allow around 30 to 40 mins to get it to room temp or 27°C. This step isn't essential, but makes it easier to mix and get it more active. You can also add the water at the beginning of this process - that makes it even easier to mix when you add the flour.
- Once it's warmed up, add in a your initial 530g of water and 530g of flour for your loaf. This works best if you pour the water in first and from a bit of a height, as it breaks up the starter dough and makes it much easier to mix. Or you can add it right at the beginning and mix up just before you add the flour.

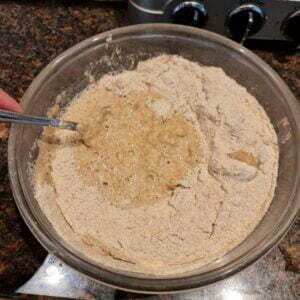
- Mix well to a rough wet dough - don't overmix it though as this will start to develop the gluten - do it just enough to completely mix the dough.
- Remove 400g of the batter/wet dough at this point and cover and put back in the fridge. Make sure to put the reserved 400g of starter in a clean bowl and lid: kept in the fridge, it will keep generating batches of leavening for successive loaves but will never be used in its entirety. Removing it before the bulk fermentation increases the time it can remain dormant in the fridge - which is roughly 2 weeks maximum. You can leave it longer, but if you get a pink mould growing on it you will have to start again. If you want to keep it longer - you can freeze it, or you can feed it say 100g of water and 100g of flour and discard 200g - that will give you another 2 weeks at least.

- Then cover the remainder of the dough, and leave for approximately 3 to 4 hours at a room temp of around 21°C (or rapid method 2 hours at 27°C). It's a good plan to allow the dough to cool down from 27°C to room temperature before beginning the kneading. In the bowl you will have a total of 1020g of very soft sticky batter/dough – which will be composed of the 530g of water and 530g of flour (called 100% hydration). During this waiting time it will expand to be roughly double in size and should ferment fairly vigorously with lots of bubbles visible from the side if the dough is in a glass bowl. Timing is a little tricky, but if you do this last thing at night and keep it in a lower temperature (around 7°C) it should be possible to do overnight - although I haven't tried that yet. I prefer using a temperature controlled proofing cabinet which gives better control of the timing. Actual amounts of mixture will be a little less as some dough gets left behind in the various bowls.

- This is what it looks like, after the fermentation - when the bulk dough has roughly doubled in size.

- This 1060g of dough, plus some extra flour, fat and salt will be used to make the loaf. For the best results add the remaining195g of extra flour FIRST to your bread machine pan. Then add the (almost) 1060g of dough/batter to your bread machine pan. Then 40g of margarine or olive oil, and 10g of salt – but no extra water (unless using the optional ground seed mixture). You will now have 730g of flour, 530g of water, the salt and the margarine/fat – enough to make one good sized loaf. You need slightly more flour because some gets left behind in the bowls. It will be a 73% hydration dough for the technically minded.
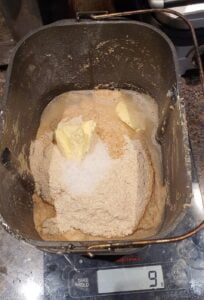
- Set the bread-machine to the 45minute pizza or similar 45min dough only program, and the bread-maker will do all the hard work and transform it into a nice soft (but sticky) dough. Only allow the program to run for 10 minutes or so, because the fermentation does a lot of the kneading work for you. Overkneading leads to loss of elasticity and affects the rise and structure. If you don't have a breadmaker but have a stand mixer - use that with the dough hook.

- During the pizza/dough program mixing, and also a little before you stop the dough program , open the lid to check all the flour is incorporated into the dough – it may need a bit of a helping hand with a plastic spatula to make sure it’s all incorporated in the dough. Sometimes the dough sticks to the bottom. Adding a few dustings of flour from a shaker (towards the end) helps stop this happening.
- While the kneading is happening, grease the sides and bottom of a 2lb loaf tin. You can line the bottom with greaseproof paper - but with my well used tin that's not necessary. If you use a good quality non-stick pan, you will not have to line the bottom.

- As soon as you stop the pizza dough program immediately remove the pan and tip into the waiting greased tin. If you let it stand, the dough will stick to the pan and be difficult to remove, so make sure to stop/turn if off and immediately tip the dough straight into the waiting greased bread tin. If you don’t time it right or do this, it can be difficult/messy getting all of the dough out of the bread maker pan as the dough is quite sticky due to the fermentation.
- Use a spatula to get any last bits stuck to the paddle/sides out and spread out in the tin with a wooden or plastic spatula. You can sprinkle a little flour on top and pat/smooth it with your hands to help spread and gently push down into the corners of the tin or try using a couple of spatulas so you end up with a reasonably flat surface.

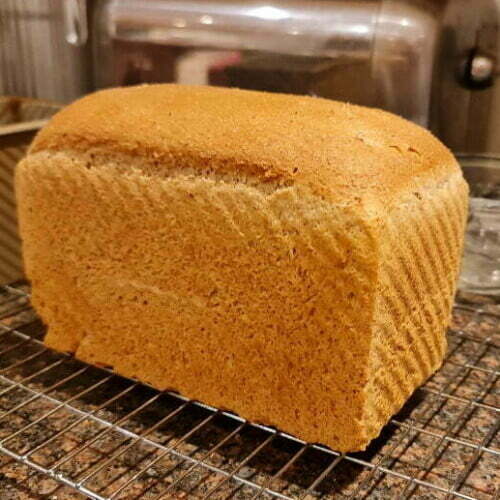
- Leave to rise until the dough is at least double in size – so the edges are at but not above the top of your tin - usually between 2 ½ and 3 hours depending on how active your starter is and how warm the location. 25-26°C is a good compromise for the rising temperature - max 27°C or off flavours may predominate. A rule of thumb is at 21°C it will be 3 hours, at 27°C it will be 2 hours. It should have a nice dome above the sides of the tin - see picture.

- It’s important not to let the dough rise for too long – you can estimate a doubling in size for the dough, or use the 2-finger method. Press the top with 2 fingers – if it springs back immediately, it’s still not fully risen – if the indentations linger and slowly come back – it’s ready to go in the oven. If the indentation remains – it’s probably over risen so give it less time in future.
- Bake at 190°C fan oven on middle shelf for 42 minutes depending on how brown you like the crust to be. A way I've been experimenting with to get an even better rise is to put it in a pre-heated oven at 220°C for 15 minutes - then turn it down to 185°C for the remaining 27 minutes - 42 minutes in total.

- Leave for a few minutes then turn out and leave to cool on a wire rack.

- Then once it's cool, I put in a plastic bag and leave for a couple of hours. This softens the crust, and it can then be sliced and frozen. That way you never waste any bread. It works really well if you toast it from frozen.

Notes
-
When creating your initial starter: -
Always use filtered or bottled water – the chlorine will impede or even prevent the natural yeasts from becoming active enough. Use good quality Dove’s Farm or similar wholegrain BREAD/strong flour, and make sure it is fresh – no more than 6months as an absolute max. - This bread is nice just as bread, but can also be toasted. It will keep much longer than standard home-made yeasted bread as the natural ph. of the loaf tends to inhibit mould formation.
- I've also been experimenting with overnight cool rising. I have a wine cellar set at 12°C and overnight fermentation takes 8 hours and then the next day rising takes around 8 hours also. This means you have more flexibility in timing your baking. I haven't tried full on fridge rising, but I'm guessing that would be more like 12 hours.....
- The eagle eyed will notice that I've increased the quantities a little since I first posted this recipe. This is because the bread tin I'm using really needed more dough to enable it to rise to the top of the tin. The ratios all remain pretty much the same - just the total volume/weight has changed.
- Another tip to try is adding a tray of water to the oven with around 300g of water when you warm the oven to start. Take out for final 20 minutes. This improves oven lift, and appearance/smoothness of the crust.
- https://www.amazon.co.uk/Folding-Chocolate-Proofing-Fermenter-Multi-Cooker/dp/B01MQK1204/ref=pd_lpo_79_t_0/260-4067861-2030369?_encoding=UTF8&pd_rd_i=B01MQK1204&pd_rd_r=ca7be74e-9035-44f5-b729-0ab51ce26313&pd_rd_w=5N85O&pd_rd_wg=bT4Q6&pf_rd_p=7b8e3b03-1439-4489-abd4-4a138cf4eca6&pf_rd_r=67N9YV4CAEXWKG4Z1HQM&psc=1&refRID=67N9YV4CAEXWKG4Z1HQM
- Sourdough interesting facts:- https://truesourdough.com/when-to-use-sourdough-starter-at-its-peak-to-bake-good-bread/
- for the latest loaf I'm using 530g water 530g flour
- 70g seeds plus 55g water or plant milk
- 40g rapeseed oil
- 190g extra flour
- 10g salt
- Some sourdough folk say that the yeasts etc come from the atmosphere. Personally, I think that's nonsense and that as with grapes the necessary yeasts and bacteria are present in the freshly ground flour.
- When using the bread machine to knead, if the dough is overfermented or too warm, it can get very stuck to the bottom and not come out in a clean easy to manage ball. To avoid this, during the last 4 minutes of kneading, sprinkling some extra flour on the dough will help to pick up the dough into a smooth easy to remove ball. You may need to do the flour shaking thing a 2 or 3 times as necessary.
- Once you have your starter working well, and giving you a good reliable rise - after say half a dozen loaves - I strongly recommend adding an extra 200g of flour and 200g of water to your bulk fermentation, and then taking that extra 400g of starter out at the end of the bulk fermentation, and putting it in the freezer as a back up. As your starter evolves you can replace it with a more advanced one. That way if you should ever ruin your starter - you can get the back up out of "cold storage" and use that. It takes a couple of loaves to get it fully up to speed, but it's a lot less hassle than starting over again......
- Final point - if you're making a loaf the next day, or very soon after, I would take your next loaf's starter out at the end of the bulk fermenation - that way it's fully regenerated. If you're planning on a much longer gap, take it out at the beginning immediately after mixing with the flour and water. This is because if it's going in the fridge for a week or more, it's best if it has plenty of food to feed the bacteria and yeasts.
Tried this recipe?Let us know how it was!